Showing posts with label diy. Show all posts

Thursday, January 21, 2016

A DIAPER CAKE

Lindsay came by last night with a bag of diapers - some ribbon and 4 receiving blankets.
She's in charge of making her sister-in-law's diaper cake ( centerpiece ) for her soon to be shower and so I did what I do best - completely took over.
I know everyone has seen one of these and I'm betting most of you have made one


so if there's ONE of you that haven't made a diaper cake this post is for you -
we used one pack of pampers ( new born size - 88 diapers ) but any size will do
and rolled all of them - securing each one with an elastic like so


which we then placed in a pan to create the shape for the bottom layer


place an elastic around the layer while still in the pan so that it retains its shape while removing it.
( the elastic will later be removed and replaced with ribbon or blankets ) and your first layer is done!


You can then insert a wrapping paper tube in the middle of the cake - this will hold any additional layers


continue rolling diapers and placing them on top of the bottom layer until you have as many tiers as you want three seems to be the perfect size - and what a full pack of diapers allows for.

and then the decorating starts !
we chose to go with a " fondant " icing - using up the 4 receiving blankets Lindsay had bought - by folding them and wrapping them around the diapers - and securing it with straight pins - ribbon was then wrapped around that.
For the second tier I have two blankets folded into different widths


and to cover up the tops of the diapers on the bottom tier I placed a ribbon ( with cut up yellow straws holding the ribbon down in between each diapers )


I found some tiny stickers in my supplies - letters and numbers and stuck them on the ribbons but I'm still awaiting my daughters approval on that step - she kind of put a kibosh on my first design - which included flowers - Hey what do I know - I'm just the baker !


There may still be a little tweaking - we have a few diapers left which I'm going to turn into cupcakes but it's basically done


John says it looks good enough to be on Cake Boss


It's such a pretty way to present a gift - in my day we wrapped up a box of diapers and tossed it at the Mother to be LOL
whoever first came up with this idea ( John thinks it was me - I'm not going to disillusion him ) was a genius!
Level of difficulty?
PIECE OF CAKE ( couldn't resist - absolutely could not resist )

Have a wonderful day everyone
This is the first day in a week I'm not walking around doubled over - my back is on the mend - Oh Happy Day !!!

Hugs,
Me


LOOKING FOR INSPIRATION?
JOIN ME AT THESE FABULOUS PARTIES !

FRENCH COUNTRY COTTAGE                              MY TURN FOR US
THE PIN JUNKIE                                                       MY ROMANTIC HOME
ONE MORE TIME EVENTS                                      THE INTERIOR FRUGALISTA
LIFE ON LAKESHORE DRIVE                                 BETWEEN NAPS ON THE COUCH
LEHMAN LANE                                                         HAVE A DAILY CUP OF MRS. OLSON
THE ESSENCE OF HOME                                         LAMBERT'S LATELY
I GOTTA CREATE                                                      A GLIMPSE INSIDE
GIGGLES GALORE

Wednesday, November 18, 2015

MAKING RAG WREATHS

I can't knit or I'd knit a new house probably
I can't sew ( shamefully I'm the daughter of a seamstress ) 
But I CAN tie pieces of cloth together and create something out of fabric :)


I wanted to make a wreath for Evan's room and had no idea where to start - until I saw John destroying fabric swatches from our business
( we represent fabric lines from Europe and so we always have swatches ) 

Suzan screams - OMG - are you throwing those out?
John says - Yeah - why?
John says - They're little bits of fabric - you can't do anything with them
Suzan says - as I'm scrambling around emptying the trash bin - SHAME ON YOU !  These don't belong in the landfill !
John says - Are you going to go through the garbage every time I throw something out?
Suzan says - Well I'm certainly going to start inspecting it before it goes to the curb !


They're very small pieces so I cut each one into 3 strips


and tied them together


so each strip ended up having 4 " tails " which worked great for fullness !

I used embroidery hoops 2 sizes - small and medium -  because I had a few on hand from a project long long ago and tied each strip on them


At one point my fingers started hurting a little

John says - You're going to ruin your hands permanently if you keep up with these " projects "
Suzan says - I want my hands to be completely used up when they bury me - 
John says - You're the most morbid person I know

Ahhh.............but I can make a rag wreath.


Aren't all the little bits of cloth just perfect together?
They're my " wreaths of many colors "
I made them while watching t.v. in bed - repeats of Downton Abbey to be precise - the next morning John woke up with lint and threads all over his boxers - I burst out laughing

Suzan says - You look like a human lint brush
Suzan says - Wait I want to get a picture

But he threatened to break my fingers...............you know - the ones he was so concerned about the day before?

Suzan says - Wreaths are very expensive to buy - think of the money I saved !
John stops ...........
John says - Really?  Why don't you make a ton of them and sell them?

Hmmmmmmmmmmm.  My fingers John - think of my poor fingers

John says - Well YOU said you wanted to use them up.
Suzan says - You're what the Chinese would call a Capitalist Pig
John snorts - China's full of capitalist pigs - probably more than here

Have a wonderful day everyone
I'm off to google why a communist country is filled with capitalist pigs.
And then I may just  make a few wreaths to sell !
( maybe I could sell them in China ? )

Hugs,
Me


LOOKING FOR INSPIRATION?
JOIN ME AT THESE FABULOUS PARTIES !

HAVE A DAILY CUP OF MRS. OLSON                    GRACE & GOOD EATS
THE CHARM OF HOME                                              MY ROMANTIC HOME
BETWEEN NAPS ON THE PORCH                            SAND & SISAL
FLUSTER BUSTER                                                       SAVVY SOUTHERN STYLE
MY SALVAGED TREASURES                                    CRAFTY ALLIE
THE SHABBY ART BOUTIQUE                                 TOO MUCH TIME ON MY HANDS

Monday, September 28, 2015

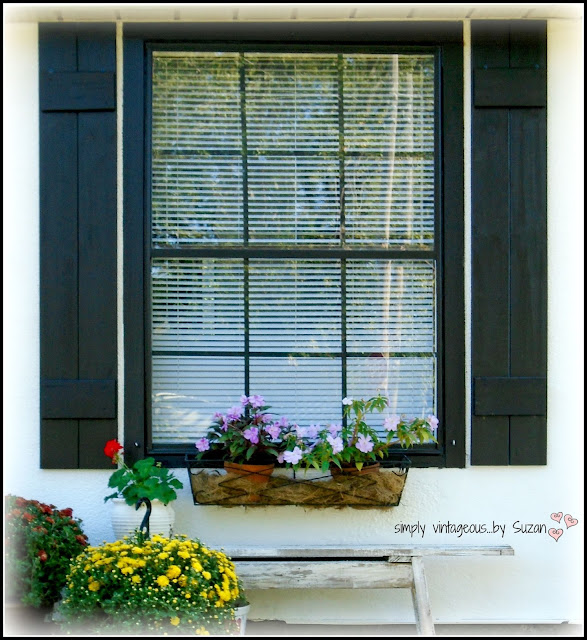
We DIY'ed Outdoor Shutters !

Good Morning everyone !

Out of guess what?
Fence Planks ( home depot must think we live on a ranch with acres of property to be fenced in )
Thankfully the one thing this house did have was a fenced in yard - in pretty good shape - so we haven't used one of them for their actual purpose lol


We've used them for our faux fireplace ( HERE )


I added them to a frame in a guest room ( HERE )


The kitchen island ( HERE )


A christmas tree ( HERE )


Made built ins in the den ( HERE )


And a plank wall that I can't find the post for.....................

And now?
DIY Outdoor Shutters !
These things are so expensive store bought....................we paid a lot of money for them 2 houses ago - just one pair cost over 300.00 and that was at least 10 years ago - I can't imagine what they charge today.
We made 2 sets for next to nothing !

Each shutter took 2 planks - that's it ............... ( 3 would be more substantial but these front windows lead to the enclosed porch and the wall is not large so 2 were perfect for this project ) cut to the size of the window with the excess being used on the top and bottom to hold them together AND THAT'S IT !


I painted them black ( after painting the frame of the windows black - as well as the grid work )
Can I tell you that I will never wash these windows again?  They HAVE to be replaced - and anyone with old aluminium windows will know exactly what I'm talking about  - it took me hours and hours to get it done - they stick -they jam - they wobble - they're a.w.f.u.l. - BUT they do look somewhat better painted.
We haven't had much time to work on the front of the house - and it desperately needs work so I'm thrilled we've started !
Here's a close up of what they looked like


Isn't that U. G. L. Y  ( they ain't go no alibi ) ?
It was a sunny day working on them ( but a little crisp - Fall is here in Montreal  let me tell you ! ) and perfect drying weather


I painted the shutters ( and window frames ) with Behr Premium Ultra - Paint & Primer in one - exterior with a satin finish..............although I use Behr for all interior work I've never used it for outside - so I'm hoping it's a paint that endures..................


If you buy an old house here's a little advice you can take to the bank..................( well maybe don't take it to the bank or they'll never agree to you buying it in the first place - so maybe just take it to heart )
Measure each window - and each side of each window - do not make a template and cut them all down equally - even if every window looks the same.................you can't assume one side will be the same as the other - all 4 of these shutters are slightly different sizes - they did things differently back in the day lol !


Every job we start with this dump house I end up wondering what on earth I could ever have been thinking of - and then when it's finished I think...................." all it needs is love - da da da - all it needs is love love - love is all it needs "


And fence planks.


Such a cost effective way to implement big change, no?
( I should mention that I gave the front a fresh coat of white paint too )

AFFORDABLE DIY SHUTTERS

Now I have to finish the other side - and then the 2 side windows - and then all the rest of them -
only about - oh - 24 shutters to make..............
Still it's getting less and less embarrassing to come home !!!

EXTERIOR SHUTTERS FOR 10.00 A WINDOW

And I'm not even sure what's made the biggest impact - the paint - the shutters - or the fact that the windows finally were washed -  all I know is that these shutters cost aprox. 10.00 per window..................( we had to buy the masonry screws and the bit to go with it so a little more for us -  but we now have enough for all the windows )
Never has 10.00 gone so far ( with our home reno's anyway ! )
Each Cedar ( treated ) plank cost 2.50 - each shutter took 2 planks ( including the cross pieces )

BEFORE & AFTER WINDOW WITH DIY SHUTTERS

Have a wonderful day everyone !
Enjoy the Fall weather you've all been anxiously awaiting !
( I'm still wishing it was hot - the swimming pool is taunting me mercilessly )
And I've got to wash the windows on the other side - and paint them - and install shutters !
Hugs,
Me


LOOKING FOR INSPIRATION?
JOIN ME AT THESE FABULOUS PARTIES !

BETWEEN NAPS ON THE PORCH                            COASTAL CHARM
SAND & SISAL                                                     A STROLL THRU LIFE
CONFESSIONS OF A PLATE ADDICT                      MEMORIES BY THE MILE
AN EXTRAORDINARY DAY                                      KATHE WITH AN E
HOME STORIES A TO Z                                             FEARLESSLY CREATIVE MAMAS
FLUSTER BUSTER                                                       SAVVY SOUTHERN STYLE
REMODELAHOLIC                                                      THE CRAFTED SPARROW
MISS TOODY GOO SHOES                                        FUNKY JUNK INTERIORS
ONE MORE TIME EVENTS                                         LIFE ON LAKESHORE DRIVE
DIY SHOWOFF                                                            REDHEAD CAN DECORATE
DWELLINGS - THE HEART OF YOUR HOME          THAT'S WHAT CHE SAID
KEEPING IT SIMPLE                                                    CARRIE THIS HOME
MY SALVAGED TREASURES                                     LEHMAN LANE
I GOTTA CREATE                                                         LAMBERTS LATELY
LIVE LAUGH ROWE                                                     THE DEDICATED HOUSE
GRACE & GOOD EATS

Sunday, May 10, 2015

DIY ART ( & Ikea )

Good morning everyone !

We've been really busy working on things but thought I'd pop in and share this - in case any of you are on your way to Ikea today 


Every now and then I come across something from that store that is just too cute for words !

Such as these black silhouette planters !

IKEA
For 6.99 each ( here in Montreal - you just know they're cheaper in the States, right ? )
From their website I thought they were stickers but they're actually black steel and the perfect Spring decor.

You can use the bottom rings to have them stand on a surface like this

IKEA
Or you can grab any old frame that you've backed with fence board - and rest them inside like this

DIY Wall Art

This simple fence planked frame is the perfect back drop for so many different styles !
I had a glitzy round mirror in it previously - but this is so " Spring like " right?

A nail in one of the " petals " holds them up - while the bottom pieces tuck perfectly into the bottom ledge of the frame


It rests over the guest room bed


Where the black curves tie in with the bed frame itself


Have a wonderful Monday everyone !
Much love
( what are you waiting for ?  Get to Ikea ! )
Me


LOOKING FOR INSPIRATION?
JOIN ME AT THESE FABULOUS PARTIES!

BETWEEN NAPS ON THE PORCH                                    COASTAL CHARM
MY UNCOMMON SLICE OF SUBURBIA                         KATHE WITH AN E
HOMESTORIES A TO Z                                                      THE DIY DREAMER
FLUSTER BUSTER                                                               SAVVY SOUTHERN STYLE                     MY SALVAGED TREASURES                                            COMMON GROUND
FROM MY FRONT PORCH TO YOURS                           ANDERSON & GRANT
HAVE A DAILY CUP OF MRS OLSON                             I GOTTA CREATE
FRENCH COUNTRY COTTAGE                                        THE SHABBY ART BOUTIQUE
TOO MUCH TIME ON MY HANDS                                   MY TURN FOR US
MY ROMANTIC HOME                                                      GIGGLES GALORE
COOKING WITH CURLS                                                   FUNKY JUNK INTERIORS
PIECED PASTIMES                                                             VINTAGE PAINT & MORE
LIFE ON LAKESHORE DRIVE                                           IT'S OVERFLOWING
THE DIY SHOWOFF                                                           FINE CRAFT GUILD
DWELLINGS - THE HEART OF YOUR HOME                 THAT'S WHAT CHE SAID
REMODELAHOLIC

Tuesday, May 5, 2015

I painted my DIY Faux Fireplace

Good morning everyone !

It was 28 degrees in Montreal yesterday ( 82 degrees in " American " ) with a beautiful breeze.
I was in shorts and a t-shirt and my favorite footwear - flip flops.
It's simply glorious to be outside working on cleaning up the yard :)

But before I went out there I gave the mantel in my bedroom a quick dry-brushing of Annie Sloan Chalk Paint - in pure white.
(It was that or carry it downstairs and through the house and into the back yard.
I seriously considered putting it in our outdoor " dining " area - but I didn't have the energy it would require )

DIY faux fireplace

I wanted to lighten it up though if it was staying in the bedroom - you know, just because it's summertime and the livin' is easy )

John says - Are you going to paint it seasonally?
Suzan says - Maybe .................

I hung a magazine basket and wrote our names on each section

John says - Oh good I can keep my kindle in there
Suzan says - Nope, no room
John says - So why didn't you just write Suzan & Suzan?
Suzan says - Because that would just look selfish.

I mean if you're going to be selfish - it's best not to look it to the outside world, right?

They're a perfect place to keep a few books I plan on reading.  ( some for the first time - some again )


 I'm liking it so much better than the grey I originally painted it in


Doesn't it look a little more " summery " now?


That art work on the mantel?  I bought that at the Louvre about 5 years ago..........it's a print of a famous sculpture................I bought it so I'd look sophisticated.
Don't ask me who the sculptor is - I have no idea - because I'm not sophisticated.
But I actually saw it in person :)

UPDATE - Su from  Butterfly 8)(8 Bungalow pointed out the following ( because she IS sophisticated)

"The figures are Cupid and Psyche, and it's in the Louvre. It's the Kiss by Antonio Canova."
I feel just a tiny bit more worldly now LOL - not that I'll remember this information tomorrow.

Thanks so much Su !


I'll be working in the yard if anyone's looking for me today.
In my shorts..............and flip flops

DIY FAUX FIREPLACE TUTORIAL FOR DUMMIES ( AND I MEAN FOR DUMMIES ) HERE
DIY FAUX MARBLE MANTEL HERE

Have a great one,
Much love,
Me


LOOKING FOR INSPIRATION?
JOIN ME AT THESE FABULOUS PARTIES !

ELIZABETH & CO.                                                 MY SALVAGED TREASURES
DIY BY DESIGN                                                            THE ESSENCE OF HOME
FROM MY FRONT PORCH TO YOURS                     THE CHARM OF HOME
FRENCH COUNTRY COTTAGE                                  SHABBY ART BOUTIQUE
TOO MUCH TIME ON MY HANDS                            MY TURN FOR US
MY ROMANTIC HOME                                               THE SHABBY NEST
MISS MUSTARD SEED                                                 MISS TOODY GOO SHOES
FUNKY JUNK INTERIORS                                          ONE MORE TIME EVENTS
LIFE ON LAKESHORE DRIVE                                     IT'S OVERFLOWING
THE DIY SHOWOFF                                                     I SHOULD BE MOPPING THE FLOOR
BETWEEN NAPS ON THE PORCH                             COASTAL CHARM
MY UNCOMMON SLICE OF SUBURBIA                  KATHE WITH AN E
HOMESTORIES A TO Z                                                FLUSTER BUSTER
SAVVY SOUTHERN STYLE                                        THE DEDICATED HOUSE
ANDERSON & GRANT